Updating your NVIDIA graphics driver ensures that your graphics card performs optimally, remains compatible with the latest software, and is free from known bugs or security vulnerabilities.
In this post, a step-by-step procedure for updating your NVIDIA Graphics Driver, along with some troubleshooting of common issues, has been explained to ensure that you get the most from your hardware.
1. Why the Driver or Latest Update Matters to Windows?
A few reasons updating your NVIDIA graphics driver is essential include:
• Performance Improvements: NVIDIA regularly releases driver updates that improve performance relating to your GPU, especially when using new games or demanding applications. This update mostly comes with optimizations for smoother gameplay, faster rendering times, and better system performance overall.
• Compatibility: While new games, applications, and Windows updates come out, some of the older drivers might not be able to support them fully. When updating your driver, make sure that your system is compatible with all the latest software so that you don’t experience crashes or graphical glitches.
• Bug Fixes and Stability: Driver updates generally fix and improve any bugs found in the old versions. Keeping the driver updated will ensure that your system runs stable and secure, without unexpected crashes or security breaches.
2. How to Fix Issues with Downloading the GeForce NVIDIA Driver
Follow these troubleshooting steps if you are unable to download the newest available drivers from NVIDIA:
1. Check Your Internet Connection: Since large driver files have to be downloaded, stable and strong internet connectivity will be necessary. Ensure that your connection is stable and nothing, such as any firewall or antivirus software, is obstructing your download.
2. Turn Off Antivirus Software Temporarily: There is a small chance that the NVIDIA driver installer will be mistakenly identified as a threat by antivirus software. Disable your antivirus software temporarily to see if that solves the problem.
3. Clear Temporary Files—Sometimes, the temporary files disrupt the download or installation process. To clear the temporary files, follow the following steps:
a. Open the Run dialogue using Windows + R.
b. Type temp and press Enter. Clear all files in the folder.
c. Do the above again, this time typing %temp% in the Run dialogue box.
4. Download from Official NVIDIA Website: Downloads should be from the official NVIDIA website to avoid downloading substitute products and old versions of the driver. Go to the NVIDIA Driver Downloads page to download the correct and appropriate driver for your system.
5. Check for System Updates: Ensure that the Windows OS is fully updated, as sometimes an outdated system file might be interfering with the compatibility of some of the new drivers.
Go to Settings > Update & Security > Windows Update and install the available updates.
3. How to Download NVIDIA Drivers to Update Your Graphics Card
The simple steps below will update your NVIDIA graphics driver successfully :
- How to Identify Your NVIDIA Graphics Card Model:
Knowing the exact model of your NVIDIA graphics card is essential when updating your drivers or troubleshooting graphics-related issues. Here’s a step-by-step guide to help you identify your NVIDIA graphics card model on a Windows PC.
1. Using Device Manager
The simplest way to identify your NVIDIA graphics card is through Device Manager.
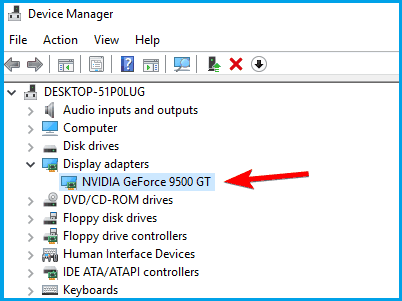
Steps:
- Step 1: Press Windows + X on your keyboard and select Device Manager from the menu that appears.
- Step 2: In the Device Manager window, expand the Display adapters section.
- Step 3: You will see your graphics card listed under Display adapters. If you have an NVIDIA card, it will typically be named something like “NVIDIA GeForce GTX 1660” or “NVIDIA GeForce RTX 3080”.
- Step 4: Note down the model number for future reference, especially when downloading drivers.
2. Using NVIDIA Control Panel
You can also identify your graphics card model using the NVIDIA Control Panel, which provides more detailed information.
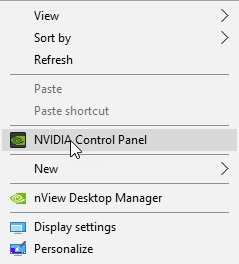
Steps:
- Step 1: Right-click on your desktop and select NVIDIA Control Panel from the context menu.
- Step 2: Once the NVIDIA Control Panel opens, click on System Information at the bottom left corner.
- Step 3: A new window will pop up showing detailed information about your system. The Graphics card section will list your NVIDIA card model along with other details like BIOS version, driver version, and more.
- Step 4: Note down your graphics card model for driver updates.
3. Using DirectX Diagnostic Tool (DxDiag)
The DirectX Diagnostic Tool is another way to find detailed information about your graphics card.
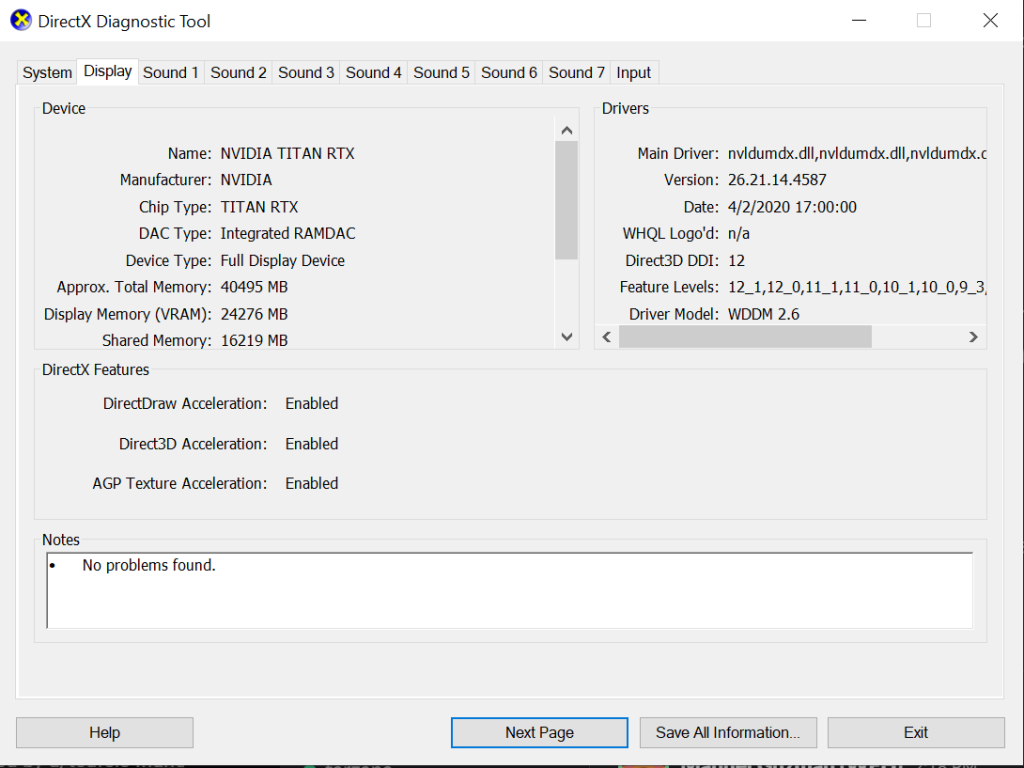
Steps:
- Step 1: Press Windows + R to open the Run dialog box.
- Step 2: Type dxdiag and press Enter. This will open the DirectX Diagnostic Tool.
- Step 3: In the DirectX Diagnostic Tool, click on the Display tab.
- Step 4: Under the Device section, you will see the Name of your graphics card, which will include the model number.
- Step 5: Write down this information for use when updating drivers or troubleshooting.
4. Using Third-Party Tools
There are also third-party tools available that can provide detailed information about your entire system, including your graphics card. Tools like GPU-Z, Speccy, or HWInfo can be downloaded and used to identify your graphics card model.
Steps:
- Step 1: Download and install one of these tools from a reputable source.
- Step 2: Open the tool and navigate to the graphics section.
- Step 3: The tool will display detailed information about your GPU, including the exact model number.
This will expand to show the Display adapters category. Note the exact model of your NVIDIA graphics card installed in your system, for example: NVIDIA GeForce GTX 1080
- Visit the NVIDIA Driver Downloads Page:
- Open your web browser and go to the NVIDIA Driver Downloads page.
- Input Your Graphics Card Details:
- Select the following details in the drop-down menus:
- Product Type: GeForce (for most consumer GPUs)
- Product Series: Select the series to which your GPU belongs (e.g., GeForce GTX 10 Series).
- Product: Choose your specific GPU model.
- Operating System: Select your Windows version.
- Download Type: Choose “Game Ready Driver” or “Studio Driver” based on your needs.
- Language: Select your preferred language.
- Select the following details in the drop-down menus:
Click on the “Search” button.
4. Download & Install the Latest NVIDIA Driver:
- Once the search results appear, click on the Download button next to the most recent driver.
- download installer to a location where you can easily find it, such as your desktop or downloads folder
Install NVIDIA Driver:
Run the downloaded file by double-clicking it. This will open up the installation.
You will be pre- sented with on-screen instructions, from which:
- You will often be given an option for Express or Custom Installation. The Express option is recommended for most users. It installs the driver along with recommended settings.
- If you have issues with an earlier driver, the Custom option will let you perform a clean installation – this removes the old driver entirely before installing the new one.
Restart Your Computer:
Once installation is complete, this often needs to be done and the new driver will be completely integrated into your system.
Check the Installation:
Once the system is rebooted, you can check that the driver is installed successfully by simply opening the NVIDIA Control Panel.
Right-click the desktop and select NVIDIA Control Panel; under System Information, it will then give a listing for the driver version.
Final Word:
You need to update the NVIDIA graphics driver to get the best performance and compatibility with the system. This step-by-step guide will let you download and install the latest NVIDIA drivers so that you have a working graphics card at all instances. Do remember to check for updates of the drivers from time to time for optimization on your system for the latest software and games.

